

Table of Contents
Introduction
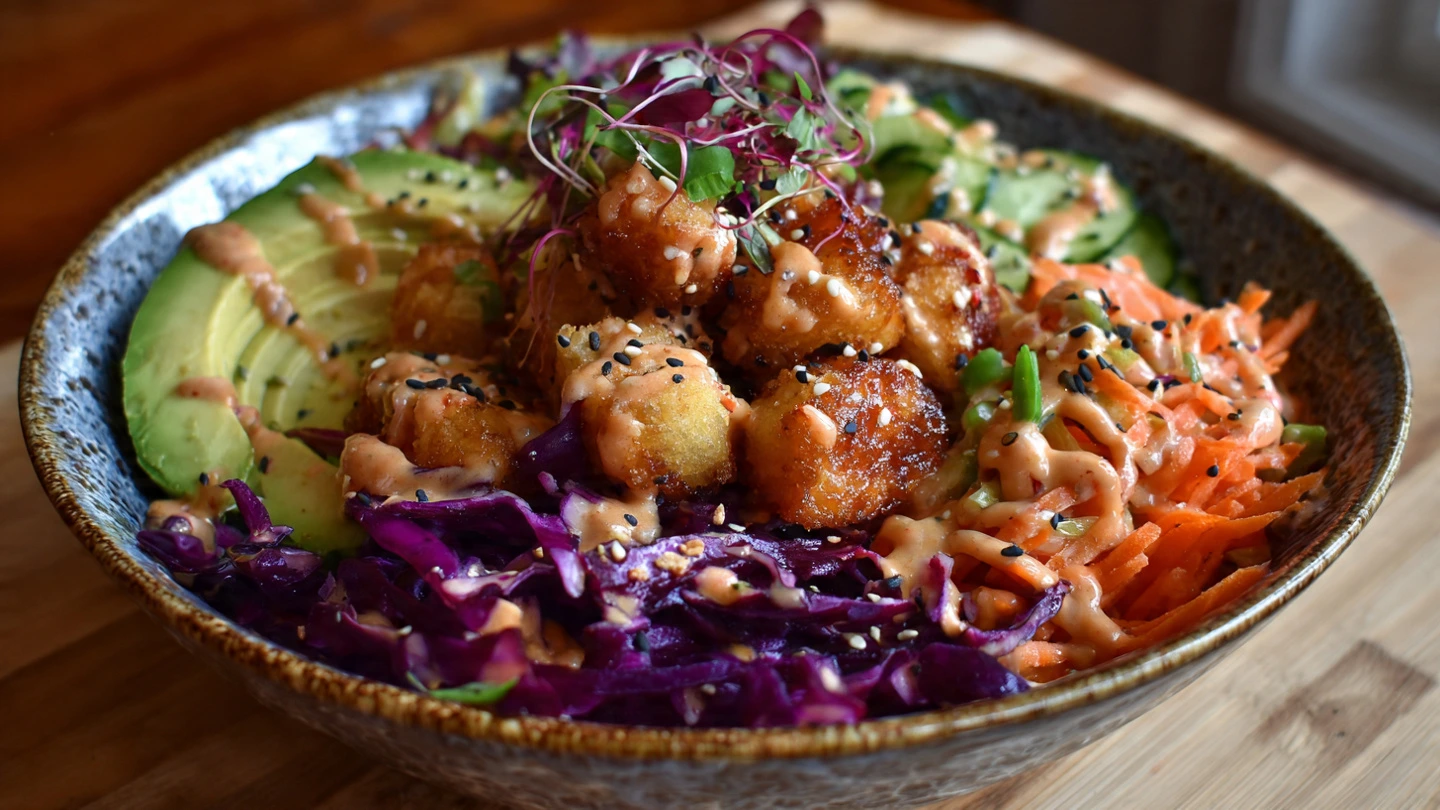
A delightful deconstruction of a sushi favorite, the Crunchy Roll Bowl captures all the beloved flavors and textures of a crunchy sushi roll in an easy-to-assemble and highly customizable format. This dish is perfect for a quick weeknight dinner, a fun meal to prepare with family, or a satisfying lunch
. It combines a base of fluffy, seasoned rice with a crispy or fresh protein, an array of vegetables, a duo of savory and spicy sauces, and a final, satisfying crunch.
Core Components of a Crunchy Roll Bowl
The beauty of the crunchy roll bowl lies in the harmony of its simple ingredients. While the combinations are endless, here’s a breakdown of what you’ll typically find in this delicious dish.
- The Foundation: Rice: The base of the bowl is crucial for soaking up the sauces and complementing the other ingredients. Perfectly seasoned short-grain sushi rice is the traditional and ideal choice, providing a fluffy yet slightly sticky texture . While other bases like brown rice or cauliflower rice can be used for a different take on the bowl, long-grain varieties such as jasmine or basmati are unsuitable for creating authentic sushi rice as they will not hold together properly . For the most authentic and delicious result, preparing your own seasoned sushi rice is a foundational step, detailed in the guide below.
- The Star Protein: This is the centerpiece of the bowl. While crispy shrimp tempura is classic, other popular options include creamy imitation crab, crispy tofu, or fresh, sushi-grade fish .
- Fresh and Crisp Vegetables: Vegetables add freshness, color, and a contrasting texture. Common choices include creamy avocado, crisp cucumber, shredded carrots, and edamame .
- The All-Important Crunch: The crunchy topping is what gives the bowl its name. This can be authentic tenkasu (tempura flakes), toasted panko breadcrumbs, or crispy fried onions .
- Flavor-Packed Sauces: The sauces tie all the ingredients together. A combination of creamy, spicy mayo and a sweet and savory eel sauce is classic, but other dressings can be used to match the protein .
The Heart of the Bowl: Mastering Perfect Sushi Rice
Crafting the perfect seasoned sushi rice is the foundational art of an exceptional crunchy roll bowl. Its ideal texture—fluffy yet slightly sticky, with each grain distinct—and balanced sweet, tangy, and savory flavor are paramount
Step 1: Selecting the Right Rice
The journey to perfect sushi rice begins with the right variety
- Primary Recommendation: The traditional and most highly recommended choice is Japanese short-grain white rice, also known as Japonica rice or simply “sushi rice” . Its high starch content provides the desired sticky texture . High-quality brands include Koshihikari, Akitakomachi, Hitomebore, Koda Farms, and Nishiki .
- A Worthy Alternative: If Japanese short-grain rice is unavailable, Calrose rice, a medium-grain variety, is a fantastic and widely available substitute that provides the necessary stickiness .
- What to Avoid: Steer clear of long-grain rice varieties like Jasmine or Basmati, as they lack the starch required for the grains to stick together . Also, do not confuse sushi rice with glutinous or “sticky” rice (mochigome), which has a much chewier texture .
Step 2: The Crucial Art of Washing and Soaking
This non-negotiable step removes excess surface starch, preventing the rice from becoming gummy or mushy
- Washing: Place the rice in a large bowl with cold water and gently swirl it with your fingers . The water will become cloudy. Drain the milky water using a fine-mesh strainer and repeat the process 4-6 times, or until the water runs mostly clear .
- Soaking: After the final rinse, add the precise amount of fresh cooking water to the rice in your pot or rice cooker bowl. Let it soak for at least 20-30 minutes . This allows water to penetrate the grains, ensuring they cook evenly for a fluffier texture .
Step 3: Cooking the Rice to Perfection
- Rice-to-Water Ratio: A 1:1 ratio by volume (e.g., 1 cup rice to 1 cup water) is a common recommendation, as the rice will absorb more liquid from the vinegar seasoning . For the stovetop method, a slightly higher ratio of 1:1.1 may be needed to account for evaporation .
- Add Umami (Optional): For an added layer of flavor, you can place a small piece of kombu (dried kelp) on top of the rice and water before cooking, removing it once done .
- Rice Cooker Method (Recommended): Place the washed, soaked rice and water in the cooker. Use the “sushi” or “white rice” setting . Once the cycle is complete, let the rice steam with the lid on for another 10-20 minutes . Do not use the “keep warm” function, as it can dry out the rice .
- Stovetop Method: In a heavy-bottomed pot with a tight-fitting lid, bring the rice and water to a boil . Immediately reduce the heat to the lowest setting, cover, and simmer for 15-20 minutes until the water is absorbed . Do not lift the lid . Remove from heat and let it stand, covered, for another 10-15 minutes to steam .
Step 4: Preparing the Sushi Vinegar (Sushi-zu)
This mixture gives the rice its characteristic flavor and sheen. For approximately 2 cups of uncooked rice, you will need:
- Ingredients: 4 tbsp unseasoned rice vinegar, 2 tbsp granulated sugar, and 1 to 2 tsp salt .
- Instructions: In a small saucepan or microwave-safe bowl, combine the ingredients . Gently heat and stir until the sugar and salt are completely dissolved . Do not let the mixture boil . Set the finished sushi-zu aside to cool .
Step 5: The Art of Folding and Cooling
This final step is crucial for achieving a fluffy texture without making the rice mushy
- Transfer Rice: Immediately transfer the hot, cooked rice to a large, non-metallic bowl. A traditional wooden hangiri is ideal, but a large glass or wooden bowl also works well . Avoid metal, which can react with the vinegar .
- Season the Rice: Drizzle the cooled sushi-zu evenly over the hot rice. It’s important to season the rice while it’s hot so the grains absorb the flavor properly .
- Fold, Don’t Stir: Using a rice paddle, employ a “slicing” or “cutting” motion at a 45-degree angle to fold the vinegar in and separate the grains . Do not stir or mash the rice, as this will create a mushy texture .
- Fan to Cool: While folding, vigorously fan the rice with a fan or piece of cardboard . This rapid cooling process removes excess moisture and gives the rice a desirable glossy sheen .
- Rest: Once the rice has cooled to room temperature, cover it with a damp cloth to prevent it from drying out until you are ready to assemble your bowls .
Featured Crunchy Roll Bowl Recipes
Here are step-by-step guides to creating several popular variations of the Crunchy Roll Bowl.

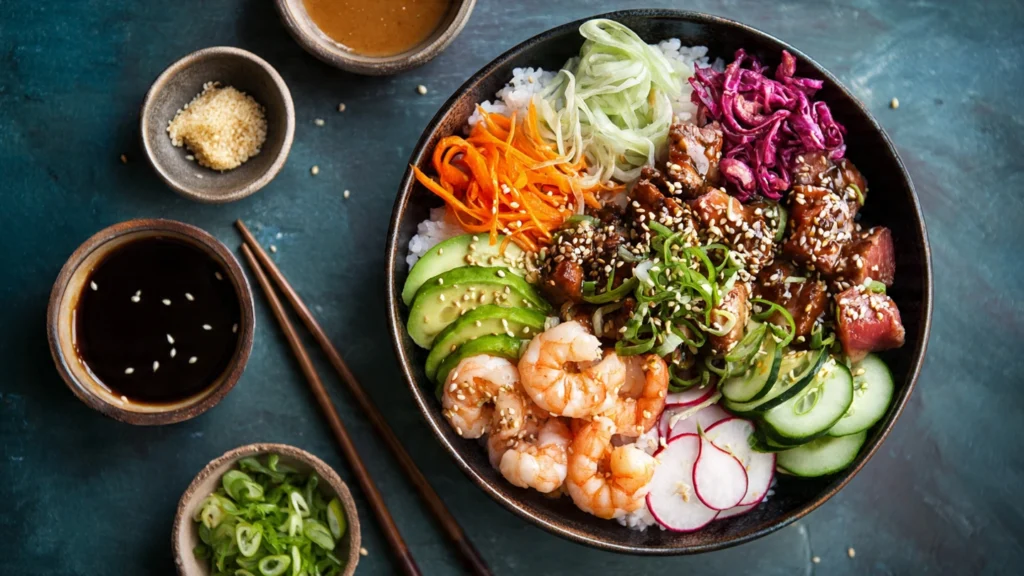
1. The Classic Crunchy Shrimp Tempura Bowl
This version features the quintessential light and crispy shrimp tempura. You can make it from scratch for the best texture or use a convenient store-bought option.
Option A: Making Shrimp Tempura from Scratch
For an unparalleled light and crispy texture, making your own shrimp tempura is a rewarding experience
- Yields: 2-4 servings
- Prep time: 20 minutes
- Cook time: 15 minutes
- Ingredients:
- 1 lb large or jumbo shrimp, peeled and deveined with tails on .
- ¼ cup all-purpose flour or cornstarch, for dredging .
- 1 cup all-purpose or cake flour for batter .
- ¼ cup cornstarch for batter .
- 1 large, cold egg .
- 1 to 1.25 cups ice-cold sparkling water or club soda .
- Pinch of salt .
- Neutral oil for frying (vegetable, canola) .
- Instructions:
- Prepare the Shrimp: Make a few shallow slits on the belly of each shrimp to prevent curling . Gently press the back to straighten it .
- Dry and Dredge: Pat the shrimp completely dry with paper towels . Lightly dredge each shrimp in flour, shaking off the excess .
- Make the Batter: Just before frying, gently mix the cold egg and ice-cold sparkling water into the dry flour, cornstarch, and salt. The batter should be lumpy; do not overmix .
- Fry the Shrimp: Heat 2-3 inches of oil to 340-375°F (170-190°C) . Dip each shrimp in the batter, let the excess drip off, and fry in small batches for 2-3 minutes per side until light golden and crispy .
- Drain: Remove shrimp with a slotted spoon and place them on a wire rack to drain .
Option B: Using Store-Bought Shrimp Tempura
For a quicker meal, reheat frozen shrimp tempura until crispy.
- Air Fryer: Cook at 360-375°F (182-190°C) for 8-11 minutes, flipping halfway .
- Oven: Bake at 400°F (200°C) on a wire rack for 14-18 minutes, flipping halfway .
2. Deconstructed California Roll Bowl
This recipe transforms the classic California roll into a simple and delicious bowl featuring a creamy imitation crab salad
- Yields: 2-4 servings
- Prep time: 20 minutes
- Ingredients for Crab Salad:
- Instructions:
- Prepare Rice: Prepare seasoned sushi rice according to the “Mastering Perfect Sushi Rice” guide above.
- Make Crab Salad: Use two forks to shred the imitation crab . In a medium bowl, combine the shredded crab, mayonnaise, sriracha, and rice vinegar .
- Assemble: Divide the rice among bowls. Top with a generous portion of the crab salad . Arrange diced cucumber, avocado, and sliced nori (seaweed) around the crab . Garnish with toasted sesame seeds and sliced green onions .
3. Crispy Tofu Crunchy Bowl (Vegan)
This vegan variation offers a satisfying crunch with perfectly cooked tofu and flavorful sauces
- Yields: 2-4 servings
- Prep time: 30-40 minutes (plus tofu pressing time)
- Ingredients for Tofu:
- Instructions:
- Press the Tofu: Press the tofu for at least 30 minutes to remove as much moisture as possible. This is crucial for a crispy texture .
- Prepare the Tofu: Cut the pressed tofu into 1-inch cubes . In a bowl, toss the cubes with soy sauce or sesame oil, then with cornstarch until lightly coated .
- Cook the Tofu:
- Assemble: Serve the crispy tofu over seasoned sushi rice with vegetables like shredded carrots, purple cabbage, and edamame . Drizzle with a vegan-friendly sauce.
4. Fresh & Crunchy Raw Salmon or Tuna Bowl
This version provides a fresh, high-protein option similar to a poke bowl. Proper handling of raw fish is crucial for safety and taste
- Yields: 2 servings
- Prep time: 25 minutes (plus marinating time)
- Food Safety First:
- Fish Selection: Purchase fish labeled “sushi-grade” or “sashimi-grade” from a reputable fishmonger, which indicates it is intended to be eaten raw . The fish should smell fresh like the ocean and have vibrant, firm flesh .
- Handling: The FDA recommends that fish for raw consumption be commercially frozen to kill parasites . Keep the fish refrigerated until use, and work with a clean cutting board and a very sharp knife . Consume the same day you purchase it .
- Ingredients for Marinade:
- Instructions:
- Slice the Fish: Using a sharp knife, slice the fish against the grain into uniform, bite-sized (about ½ to ¾-inch) cubes . This ensures a more tender bite .
- Marinate: In a medium bowl, whisk together the soy sauce, sesame oil, rice vinegar, and green onion . Gently toss the fish cubes to coat. Refrigerate for at least 15 minutes but no more than an hour .
- Assemble: Spoon the marinated fish over seasoned sushi rice. Arrange toppings like avocado, cucumber, and edamame around the fish .
Essential Sauces and Toppings
No crunchy roll bowl is complete without its signature sauces and crunchy topping.
Flavor-Packed Sauces
- Spicy Mayo: A simple mixture of mayonnaise (or vegan mayo) and sriracha . Adjust the sriracha to your preferred heat level.
- Eel Sauce (Unagi Sauce): A sweet and savory glaze that is a cornerstone of the crunchy roll flavor profile .
- Recipe: Combine ½ cup soy sauce, ½ cup mirin, ¼ cup sake, and ¼ to ⅓ cup sugar in a saucepan . Simmer for 10-20 minutes until the sauce reduces and coats the back of a spoon . It will thicken to a honey-like consistency as it cools .
- Storage: Store in an airtight container in the refrigerator for up to three months .
- Vegan Sesame Miso Dressing: A great alternative for tofu or vegetable bowls.
The All-Important Crunch
- Toasted Panko Breadcrumbs: A quick and easy way to add crunch. Toast panko in a dry pan until golden brown.
- Crispy Fried Onions: Store-bought fried onions add a savory, crunchy element .
- Authentic Japanese Tenkasu (Tempura Flakes): For the most authentic experience, make your own tenkasu (also called agedama) . These are crispy bits of deep-fried tempura batter.
- Yields: 1 batch
- Prep time: 5 minutes
- Cook time: 10 minutes
- Ingredients: 4 tbsp cake flour and 4 tbsp ice-cold water . Neutral oil for frying .
- Instructions:
- Heat Oil: Heat 2-3 inches of oil in a pot to 350°F (180°C) .
- Make Batter: Gently combine the flour and ice-cold water. Do not overmix; lumps are okay to ensure a light, crispy texture .
- Fry the Flakes: Dip your fingers or a whisk into the batter and drizzle or flick droplets into the hot oil . Fry in small batches for 30-60 seconds until light golden brown .
- Drain and Store: Remove with a fine-mesh skimmer and drain on paper towels . Once completely cool, store in an airtight container. For long-term storage, freeze them to maintain crispiness .
Assembling Your Masterpiece
- Start with the Base: Divide your warm, seasoned sushi rice among serving bowls .
- Add Protein and Veggies: Artfully arrange your chosen protein and fresh vegetables on top of the rice .
- Sauce it Up: Drizzle the spicy mayo and eel sauce (or other dressing) over the entire bowl .
- Add the Crunch: Finish with a generous sprinkle of tenkasu, toasted panko, or crispy onions .
- Garnish and Serve: Add final touches like toasted sesame seeds, sliced scallions, or strips of nori . Serve immediately to enjoy the contrast of warm rice, cool toppings, and the ultimate crunch.
Executive Summary
The Crunchy Roll Bowl is a modern culinary creation that deconstructs the popular crunchy sushi roll into a convenient and customizable bowl format. This guide provides a comprehensive overview of the dish, beginning with a detailed, step-by-step tutorial on mastering perfect seasoned sushi rice—the heart of any great bowl. This new section covers everything from selecting the right type of short-grain rice and proper washing techniques to precise cooking instructions and the art of folding in the vinegar seasoning for ideal texture and flavor.
Following the rice guide, the document presents recipes for multiple variations, including a classic bowl with homemade or store-bought shrimp tempura, a deconstructed California Roll Bowl with a creamy imitation crab salad, a fresh and savory bowl with sushi-grade raw salmon or tuna (including critical food safety guidelines), and a completely vegan option with crispy tofu. The guide is enhanced with essential recipes for key toppings and sauces, including a from-scratch recipe for authentic Japanese tenkasu (tempura flakes) and a classic sweet and savory eel sauce. With instructions for assembly, storage, and endless customization, this document serves as an all-in-one resource for creating the perfect Crunchy Roll Bowl for any preference or occasion.