Table of Contents
Introduction
There’s a certain kind of magic reserved for desserts that are both stunningly delicious and remarkably simple to create . The Strawberry Banana Pudding Dream falls squarely into this enchanting category . It’s a no-bake masterpiece, a luscious confection that layers creamy pudding, sweet fruit, and tender cookies into a dessert that’s destined to become a family favorite and a potluck sensation. This dessert is the perfect answer to the call for a show-stopping treat without the need to preheat your oven, making it an ideal choice for warm summer days, busy holidays, or any time a sweet craving strikes
This dessert is a delightful twist on the classic Southern banana pudding, elevated with the bright, juicy flavor of fresh strawberries
. The combination is a match made in heaven, blending the comforting, nostalgic notes of banana pudding with a fresh, fruity burst that feels both familiar and excitingly new . Imagine layers of velvety, cream cheese-enriched vanilla pudding, interspersed with slices of ripe banana and sweet strawberries, all nestled between layers of cookies that you can choose to customize the entire experience
. Each spoonful offers a symphony of textures and flavors—creamy, fruity, and cake-like, all at once .
What makes this recipe a true “dream” is its effortless elegance . Assembling this dessert is a joy in itself, a simple process of layering that results in a visually impressive final product, especially when showcased in a clear trifle bowl
. It’s a dessert that looks like it took hours of painstaking effort, yet it comes together in about 30 minutes of active prep time
. Whether you’re a seasoned baker or a kitchen novice, the Strawberry Banana Pudding Dream is a recipe that promises success and a chorus of “oohs” and “aahs” from anyone lucky enough to get a taste .
Why This Recipe Is a Dream: The Ingredients
The beauty of this Strawberry Banana Pudding Dream lies in the synergy of its simple, yet high-impact ingredients . Each component is chosen to contribute a specific quality that, when combined, creates a dessert that is perfectly balanced in flavor and texture .
- The Creamy Base: The heart of this dessert is its rich and luxurious pudding layer . Unlike some traditional banana puddings, this recipe is enriched with softened cream cheese and sweetened condensed milk . The cream cheese adds a subtle tang and a thick, cheesecake-like consistency that provides structure and a delightful richness . The sweetened condensed milk imparts a deep, milky sweetness and a velvety smooth texture that you just can’t get from milk alone .
- The Pudding Mix: Instant vanilla pudding mix is the secret to the “no-bake” magic . It acts as a thickener, setting up quickly without any cooking required . While vanilla is the classic choice, you can also use French vanilla for a deeper flavor or even banana cream pudding mix to amplify the banana notes .
- The Whipped Topping: Cool Whip or a similar frozen whipped topping is folded into the pudding base to create an airy, fluffy texture . It lightens the dense cream cheese mixture, making the final dessert feel indulgent yet not overly heavy .
- The Fruit: The combination of fresh, ripe bananas and juicy strawberries is what sets this dessert apart . The bananas should be ripe for sweetness but still firm enough to hold their shape and not get mushy . The strawberries add a pop of vibrant color and a refreshing tartness that cuts through the richness of the pudding .
- The Cookies: The choice of cookie is crucial as it provides the architectural backbone and defines the dessert’s final character . Different cookies dramatically influence the taste, texture, and structural integrity .
- Classic Nilla Wafers: The traditional choice, these offer a mild, nostalgic vanilla flavor . They soften considerably, creating a dense, cake-like, and almost seamless texture that blends harmoniously with the pudding . However, they can become very soft or even disintegrate after 48 hours .
- Pepperidge Farm Chessman Cookies: For a more “upscale” and decadent version, these buttery shortbread cookies are a popular choice . They have superior structural integrity, softening to a “moist cake-like texture” without falling apart, which is ideal for holding up against the moisture from fresh fruit . Their rich flavor and elegant designs also make them perfect for garnishing .
- Golden Oreos: These introduce a much sweeter, more complex vanilla flavor due to their crème filling . They provide more structure than Nilla Wafers, resulting in less mushiness in leftovers . For a less sweet version, you can scrape out the filling . Because they are thicker, they may require a longer chilling time of at least 8 hours to soften properly .
- Biscoff Cookies: To create a unique twist, these cookies infuse the dessert with warm, caramelized notes of cinnamon and spice . They are sturdy, softening while retaining a delicate snap or “whisper of crunch,” offering a complex and cozy flavor profile that pairs exceptionally well with banana and strawberry
The Ultimate Strawberry Banana Pudding Dream Recipe
This recipe is designed to be straightforward and yield a generous amount, perfect for serving a crowd in a 9×13 inch dish or a large trifle bowl .
Ingredients
For the Pudding Mixture:
- 2 boxes (3.4 ounces each) instant vanilla or French vanilla pudding mix
- 2 cups cold whole milk
- 1 can (14 ounces) sweetened condensed milk
- 1 block (8 ounces) cream cheese, softened to room temperature
- 1 container (8 ounces) frozen whipped topping (like Cool Whip), thawed
- 1 teaspoon vanilla extract
For the Layers:
- 1 to 2 boxes (7-12 ounces each) of cookies (Nilla Wafers, Chessman, Golden Oreos, or Biscoff cookies)
- 4 to 6 ripe but firm bananas, sliced
- 1 pound fresh strawberries, hulled and sliced
Optional Garnishes:
- Extra stabilized whipped cream for piping rosettes or shells
- Crushed cookies
- Whole Chessman cookies arranged in a grid or pattern
- Fresh strawberry fans or roses
- Fresh banana slices (add just before serving)
- Drizzle of caramel, chocolate, or melted Biscoff spread
- Toasted nuts (almonds, pecans, pistachios)
- Fresh mint sprigs
Step-by-Step Instructions
Step 1: Prepare the Pudding Base
In a large mixing bowl, whisk together the two boxes of instant pudding mix and two cups of cold milk until the mixture is smooth and begins to thicken
. Place this bowl in the refrigerator to set for about 5-10 minutes while you prepare the next component
Step 2: Create the Cream Cheese Mixture
In a separate large bowl, use a hand mixer or stand mixer to beat the softened cream cheese until it is completely smooth and free of lumps
. It’s crucial that the cream cheese is at room temperature to achieve a silky texture
. Once smooth, pour in the sweetened condensed milk and the vanilla extract
. Beat the mixture again until everything is well combined and creamy .
Step 3: Combine the Pudding and Cream Cheese Mixtures
Take the thickened pudding out of the refrigerator . Add it to the bowl with the cream cheese mixture . Beat on low speed until the two are just combined . Be careful not to overmix, as this can sometimes make instant pudding runny
Step 4: Fold in the Whipped Topping
Using a rubber spatula, gently fold the thawed whipped topping into the pudding and cream cheese mixture
. Fold until it is just incorporated, being careful to maintain the light and airy texture of the whipped topping
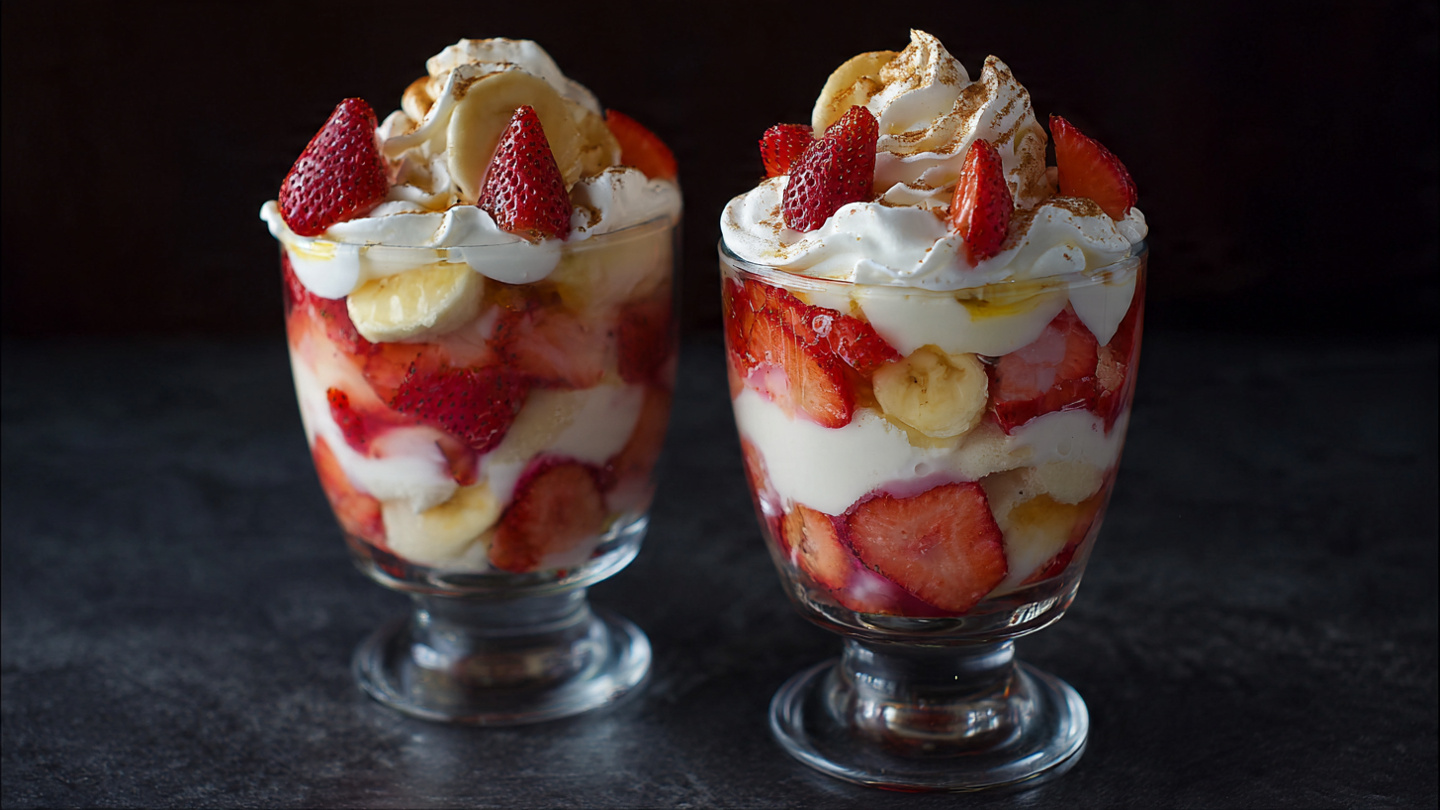
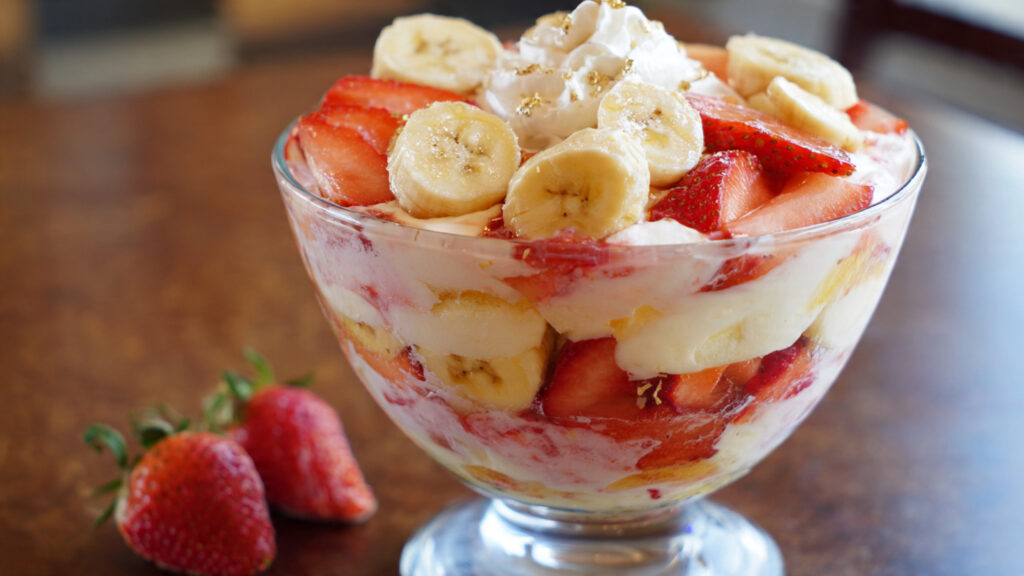
Step 5: Assemble the Dessert
Now for the fun part—layering your Strawberry Banana Pudding Dream!
- First Cookie Layer: Arrange a single layer of cookies on the bottom of your dish . For a trifle bowl, you can stand cookies vertically around the inside of the glass for a visually interesting layered effect .
- First Fruit Layer: For a stunning visual, press some sliced strawberries or bananas with their cut sides flat against the inside of the glass bowl . Then, arrange a layer of sliced bananas over the cookies, followed by a layer of sliced strawberries . Patting the sliced strawberries dry can help minimize excess juice from bleeding into the layers .
- First Pudding Layer: To create clean layers and avoid smudges, dollop about one-third of the pudding mixture into the center of the dish, then gently spread it out to the edges with a spatula . Using a piping bag offers maximum control . Ensure the pudding completely covers the fruit to limit air exposure and browning .
- Repeat the Layers: Continue this layering process—cookies, fruit, pudding—until you have used all your ingredients, typically for two or three full sets of layers . The top layer should ideally be pudding or whipped cream, as a fruit layer will darken and look unappealing .
Step 6: Chill for Perfection
Cover the dish tightly with plastic wrap and refrigerate for at least 4 to 8 hours, or preferably overnight
. This chilling time is essential. It allows the pudding to fully set, the cookies to soften, and all the flavors to meld together
. If using thicker cookies like Golden Oreos, a longer chill time of at least 8 hours is recommended
Step 7: Garnish and Serve with Bakery-Quality Flair
Just before serving, unleash your creativity with garnishes to elevate your dessert from homemade to showstopper . Here are some professional techniques:
- Piping with Stabilized Whipped Cream: For decorations that hold their shape, use stabilized whipped cream (see FAQ for recipes) .
- Rosettes: Fit a piping bag with a large star tip (like a Wilton 1M) . Hold the bag at a 90-degree angle, squeeze to form a star, then continue squeezing while moving in a tight circle around the star . Release pressure and lift away .
- Shell Border: Using a star tip, hold the bag at a 45-degree angle . Squeeze to build up a base, then ease pressure as you draw the tip down and away to create a tail . Start the next shell to cover the tail of the previous one for a continuous border .
- Creating Strawberry Garnishes:
- Strawberry Fan: Place a strawberry on a cutting board . Using a paring knife, make several thin vertical slices from just below the stem toward the tip, without cutting all the way through . Gently press down to fan out the slices .
- Strawberry Rose: Starting at the base of a large, firm strawberry, make a small, thin downward cut to create the first “petal,” without slicing through . Gently bend the petal out . Rotate the strawberry, making overlapping cuts to create a row of petals . Make smaller, staggered cuts for subsequent rows as you move toward the tip .
- Artistic Cookie Arrangements:
- Classic Grid: Arrange whole Chessman cookies in a neat grid on top for an elegant look that also guides portioning .
- Crushed and Whole: Sprinkle the top with crushed cookies, then strategically place a few whole cookies as a focal point .
- Height and Dimension: For individual parfaits, stand a whole cookie upright to add height and visual interest .
Variations and Customizations
One of the best things about this dessert is its versatility . Feel free to get creative with these variations .
Flavor and Texture Swaps
- Different Pudding Flavors: Swap the vanilla pudding for cheesecake, banana cream, or even white chocolate flavor for a different taste profile .
- Cookie Swaps: As detailed earlier, your choice of Nilla Wafers, Chessman cookies, Golden Oreos, or Biscoff cookies will fundamentally change the dessert . You could also experiment with shortbread cookies, graham crackers, or even crispy chocolate chip cookies .
- Add a Glaze or Spread: For an extra pop of flavor, drizzle a thin layer of strawberry glaze over the fruit layers . If using Biscoff cookies, enhance the experience by adding a drizzle of melted Biscoff spread between the layers .
- Macerate the Strawberries: For a more syrupy strawberry layer, toss the sliced strawberries with a couple of tablespoons of granulated sugar and let them sit for about an hour before layering . This will draw out their natural juices .
Serving Format Adaptations
This recipe can be adapted for various occasions and presentations, from elegant dinner parties to casual potlucks
Individual Parfait Glasses
This format is perfect for elegant, portion-controlled treats
- Prepare Components: Crush your chosen cookies into coarse crumbs .
- Layering: In clear parfait glasses, begin with a layer of cookie crumbs to create a stable base .
- Pipe or Spoon: Spoon or pipe a layer of the pudding mixture over the crumbs .
- Add Fruit: Add a layer of sliced strawberries and bananas. For a beautiful presentation, place some strawberry slices against the inside of the glass before adding the rest of the fruit .
- Repeat: Continue layering crumbs, pudding, and fruit until the glass is full, typically in a sequence like crumbs -> pudding -> fruit -> pudding . Finish with a layer of pudding or whipped cream.
- Garnish and Chill: Top with a piped rosette of whipped cream, a sprinkle of cookie crumbs, and a fresh strawberry fan . Chill for at least 30 minutes to 2 hours to allow the flavors to meld .
Large-Format 9×13 “Dessert Lasagna” for Potlucks
This “dessert lasagna” style is ideal for feeding a crowd, travels well, and is easy to slice and serve
- Create the Base: For a sturdier dessert, start with a pressed cookie crust (see instructions below) or a simple layer of whole cookies like Nilla Wafers or Chessman cookies .
- Optional Cheesecake Layer: For extra richness, beat an 8-ounce block of softened cream cheese with 3/4 cup of powdered sugar until smooth. Fold in a cup of whipped topping and spread this over the crust .
- Layer the Pudding: Spread half of the main pudding mixture evenly over the base or cheesecake layer .
- Add Cookies and Fruit: Arrange a layer of whole cookies on top of the pudding, followed by a solid layer of sliced bananas .
- Final Pudding Layer: Spread the remaining pudding mixture over the cookies and fruit, sealing it to the edges .
- Top and Chill: Cover the top with a layer of whipped topping and garnish with crushed cookies or an elegant grid of whole Chessman cookies . Refrigerate for at least 4 hours, but preferably overnight, to allow the layers to set firmly for clean slicing .
Version with a Pressed Cookie Crust
A pressed cookie crust adds a delightful textural contrast and provides stability, especially for the “dessert lasagna” version
- Choose Your Cookie: Crunchy cookies like shortbread, vanilla wafers, Golden Oreos, or even crispy chocolate chip cookies work well . You’ll need about 2-3 cups of crumbs for a 9×13 pan .
- Create Fine Crumbs: Use a food processor or a sealed bag and rolling pin to crush the cookies into fine crumbs .
- Combine with Butter: Mix the crumbs with melted butter. A good ratio is about 6 tablespoons of melted butter for every 1.5 to 2 cups of crumbs . The mixture should have the consistency of wet sand .
- Press into Pan: Pour the buttered crumbs into your dish and use the bottom of a flat glass or measuring cup to press them down firmly and evenly .
- Chill the Crust: This is a crucial step. Refrigerate the crust for at least 30-60 minutes (or freeze for 15-20 minutes) until it’s firm . This prevents the crust from getting soggy when you add the filling.
Dietary Adaptations
Gluten-Free Version
- Cookies: Simply substitute with your favorite certified gluten-free vanilla cookies, shortbread, or graham crackers .
- Check Labels: Always double-check that your instant pudding mix and other packaged ingredients are certified gluten-free .
Dairy-Free Version
- Dairy-Free Cream Cheese: Use a 1:1 commercial substitute or make your own from soaked cashews or silken tofu .
- Dairy-Free Sweetened Condensed Milk: Use store-bought versions made from coconut or oat milk, or make it at home by simmering full-fat coconut milk with sugar until it reduces and thickens . Canned cream of coconut is another potential substitute .
- Dairy-Free Milk & Whipped Topping: Use your preferred plant-based milk for the pudding and a dairy-free whipped topping like one made from coconut cream .
Frequently Asked Questions (FAQ)
What is the best cookie to use for banana pudding?
This depends on your preference!
- For a classic, soft, cake-like texture: Use Nilla Wafers .
- For a richer, buttery flavor and a firmer, cake-like structure: Use Pepperidge Farm Chessman cookies .
- For a sweeter, sturdier cookie that holds its structure: Use Golden Oreos .
- For a unique, spiced flavor and a texture that softens but retains a slight crunch: Use Biscoff cookies .
How do I keep the bananas from turning brown?
This is a common concern with banana desserts .
- Citrus Juice: Gently toss the banana slices in a small amount of acidic juice like lemon, orange, or pineapple juice to inhibit oxidation .
- Complete Coverage: When layering, ensure the banana slices are completely covered by the pudding mixture to limit their exposure to air .
- Timing: Slice the bananas just before you assemble the dessert and add any banana garnishes right before serving .
What if my pudding seems runny?
A runny pudding can make the dessert watery
. This can be caused by not using cold enough milk, over-mixing, or using the wrong pudding type
. Always use very cold milk, measure liquids carefully, mix instant pudding until just thickened, and ensure you are using “instant” pudding, not “cook-and-serve”
Can I make this dessert ahead of time?
Yes, this dessert is perfect for making ahead . It needs to be made at least 4-8 hours in advance, and many find it’s even better made 24 hours ahead, as this gives the flavors time to meld and the cookies time to soften
. For the “dessert lasagna” style, an overnight chill is highly recommended for clean slices
How do I store leftovers?
Store leftovers tightly covered in the refrigerator for 2 to 3 days
. After that, the bananas may become too brown and the pudding can become watery
. Note that softer cookies like Nilla Wafers may start to disintegrate after 48 hours
Can I use fresh whipped cream instead of Cool Whip?
Yes, but it’s essential to use stabilized whipped cream to prevent it from weeping and to hold piped shapes
- Pudding Mix Method: Whip 1-2 tablespoons of dry instant vanilla pudding mix with your heavy cream, powdered sugar, and vanilla . This is a quick and effective stabilizer.
- Cornstarch Method: Combine 2 cups of heavy whipping cream, 4 tablespoons of powdered sugar, and 1 tablespoon of cornstarch in a bowl and whip until stiff peaks form .
- Gelatin Method: Sprinkle 1 teaspoon of unflavored gelatin over 4 teaspoons of cold water and let it bloom for 5 minutes . Microwave for 5-10 seconds until liquid, then let it cool slightly . Whip 1 cup of cold heavy cream with powdered sugar and vanilla until it starts to thicken, then slowly drizzle in the cooled gelatin while mixing on low speed . Continue to whip until stiff peaks form .
What can I use instead of a trifle bowl?
If you don’t have a trifle bowl, you have many options! A large straight-sided glass bowl, a punch bowl, or even a large glass vase can work beautifully to show off the layers
. For a crowd, a 9×13 inch baking dish is perfect for the “dessert lasagna” style
. You can also make individual portions in smaller glasses, jars, or parfait glasses for an elegant presentation
A Brief History of Banana Pudding
While this strawberry-infused version is a modern twist, its roots are in the classic Southern banana pudding, a dessert with a history stretching back to the late 19th century . Its evolution reflects major shifts in American trade, technology, and home cooking
19th-Century Origins: The story begins in the post-Civil War era, when faster steamships made it possible to import bananas from the Caribbean and Central America, transforming them from a rare luxury to a more accessible ingredient
. The first formal recipe appeared in Good Housekeeping magazine in 1888 and was heavily influenced by the English trifle
. These early versions, originating in the North, layered sliced bananas with sponge cake or ladyfingers and a homemade cooked custard, often topped with meringue or whipped cream
20th-Century Simplification: The 20th century brought convenience to the forefront
. Around 1920, home cooks began swapping sponge cake for vanilla wafers
. The National Biscuit Company (Nabisco) capitalized on this trend, printing a banana pudding recipe on its Nilla Wafers boxes in the 1940s, cementing the cookie’s role in the dessert
. The shift to a no-bake staple was completed with the introduction of instant pudding mixes and commercial whipped toppings
. Jell-O introduced a banana cream pudding in 1964, and Cool Whip arrived in 1966, making the dessert incredibly easy to prepare for potlucks and large gatherings
. This ease of preparation likely contributed to its strong association with Southern hospitality
. This Strawberry Banana Pudding Dream pays homage to that nostalgic classic while creating a new tradition all its own